


We recommend reading this section first. Many of our customers find that reading about these key topics prior to installation speeds up the overall process.
This section provides instructions on how to install Lightroom presets, based on your software type and version.

Immediately after your purchase, you will receive a download email. If you haven't received this email, check your spam folder and add us as a safe sender. If you still can't find it, please reach out to us at support@theluxelens.com. There may be a problem with the email that you originally provided.

Your download will contain a zipped file. We recommend that you back-up this file for future reference.

Each purchase comes with three lifetime downloads. Please remember to download to your computer and not to your phone. Can't find your downloaded file? Downloaded files are often found in the downloads file on your hard drive, sorted by date.
If you have a PC: Right-click on the downloaded folder and then click “extract all”. If you have a MAC: Double-click on the downloaded folder and your computer will automatically extract all. Some newer PCs and MACs will automatically unzip the file following download.

Save the extracted files in a documented location on your computer.
Lightroom Classic CC: Open Lightroom Classic CC > click on the Help dropdown > click on System Info. 
Lightroom CC for desktop: Open Lightroom CC > click on the Help dropdown > click on System Info.

Lightroom Mobile (free app): Remember, you can easily sync your presets with the free Lightroom mobile app, if you have a paid subscription to Adobe Lightroom CC. If you don't have a paid subscription to Adobe Lightroom CC and you're using the free Lightroom CC mobile app, you can still install our DNG files directly to the mobile app.

Photoshop ACR: Open the Help menu > select About Photoshop. On a Mac, open the Photoshop menu > select About Photoshop.

** You will be installing the XMP formatted files into the Camera Raw > Settings folder.
* If you have Lightroom Classic CC v.7.3 or later, but only have access to LRT formatted files (instead of XMP formatted files), you'll can install the LRT files and auto-convert them to XMP files.
Using our Lightroom preset installer is the easiest way to complete your installation, with no further steps needed.
Open the Camera Raw > Settings Folder on your computer via the following file pathway:
On Mac, you may need to press ⌘ + G or shift + ⌘ + G and paste the above path into the Go To sheet, as the User Library folder may not be visible.
Once Step 1b is complete, go to step 2. If you have trouble finding the Settings Folder, go to Step 1c.
Then, click on the Presets tab > click on Show Lightroom Develop Presets

Finally, select the Camera Raw folder (not the Lightroom folder). The Settings folder will be inside of the Camera Raw folder. The Setting folder is where you will place your .xmp (not .lrt) preset files in the next step
Once Step 1c is complete, go to step 2.
Find the folder containing your .xmp formatted downloads. Take care to only select the preset collection folder and not the brush collection folder – your download will include both.

Add your selected .xmp formatted collection folder to the Camera Raw > Settings folder by using the copy and paste function or drop and drag function on your computer.
Proceed to Step 3.
When you re-open Lightroom, your presets will be installed.
To access your presets, go to the Develop module and you will see them in the left-hand menu. Click on the name of any preset to apply it to your photo. Please note that you must have a photo loaded in Lightroom in order to see your list of presets.
** You will be installing the .lrt formatted files into the Lightroom > Develop Presets folder.
Using our Lightroom preset installer is the easiest way to complete your installation, with no further steps needed.
With Lightroom open, go to:
If you have a PC: Edit > Preferences. If you have a MAC: Lightroom > Preferences.
This will open a new window. In this window, you will see a tab labeled “store presets with this catalog”. Make sure this is unchecked.
Go to the “Presets” tab and click on the “Show Lightroom Presets Folder” button. This will open Adobe folders on your computer.

Click to open the “Lightroom” folder. Then click to open the “Develop Presets” folder.
If you have not installed any presets in the past, you will only see a folder called “user presets”. Do not install your presets in the "user presets" folder. If you have installed other presets in the past, you will see them listed in the "develop presets" folder. Copy the presets that you downloaded in step 2 and paste them into the “develop presets” folder. This includes tool and layer presets, but not brushes.

Now, completely close Lightroom. When you re-open Lightroom, your presets will be installed.
First, make sure that you have a photo loaded, otherwise your presets may not show up in the menu. To access your presets, go to the develop module and you will see them on the left hand side. Click on the name of any preset to apply it to your photo.
![]()
STEP 2: LOAD A PICTURE
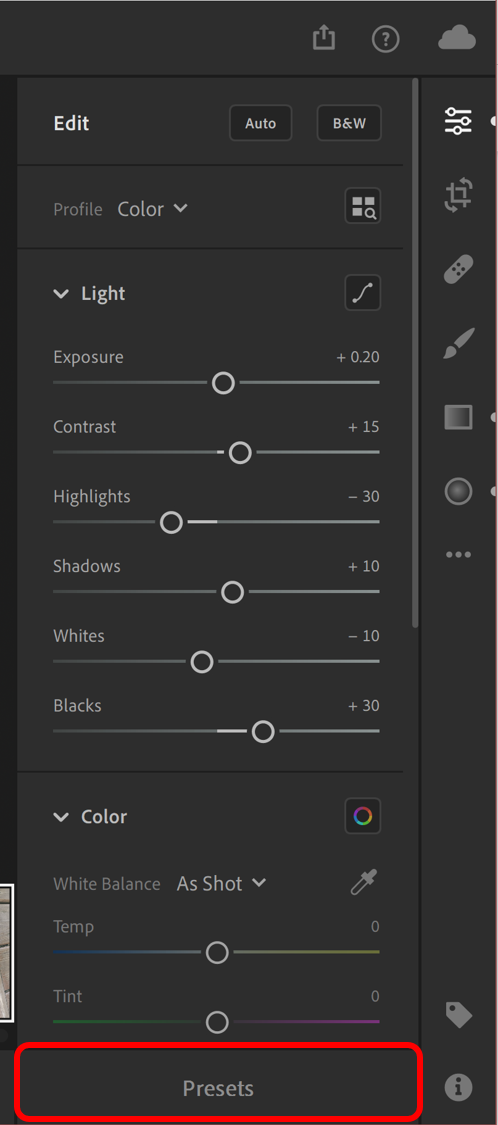
STEP 3: CLICK ON THE EDIT ICON

STEP 4: CLICK ON THE PRESETS BUTTON


The free Camera Raw plug-in installer is located at Adobe.com. Alternatively, access this download via your Creative Cloud desktop app.
Using our Lightroom preset installer is the easiest way to complete your installation, with no further steps needed.
Find the following location on your computer hard drive:
Copy and paste the .xmp presets into the Settings Folder.
Windows Users: If you are unable to find your Settings Folder, you will need to change your folder options to show hidden files and folders. See instructions here
Mac Users: If you are unable to find your Library Folder, see this article
Mac Users: If you are unable to find the Settings Folder follow the steps below:
Go to your Finder and select Go > Go to Folder from the drop-down menu. Copy and paste the following in the search box: ~/Library/Application Support/Adobe/Camera Raw/Settings
Open your image in Photoshop. Click on the Filter tab and select Camera Raw Filter from the drop-down. This will open Camera Raw in a new window.
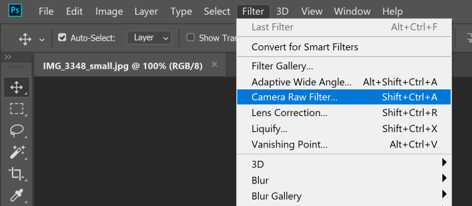
Then, click on the presets icon


